In a modern business, your decision logic can't live on an island. You need a way to connect your powerful, business-driven rules in DecisionRules to the rest of your technology stack—to send notifications, trigger approvals, and orchestrate complex, multi-system workflows. This is the power of automation platforms, and the good news is, connecting them to DecisionRules is incredibly simple.
Because DecisionRules is an API-first platform, any automation tool that can make a standard REST API call is instantly compatible.
In this practical, step-by-step guide, we will focus on one of the most popular and flexible platforms available today, N8N. We will walk you through two essential patterns for building a powerful automation workflow:
- Executing a DecisionRules rule from N8N to automate notifications.
- Triggering an N8N workflow to manage a human approval process.
By the end of this tutorial, you will be able to build sophisticated, automated decisioning workflows that bridge the gap between business logic and real-world action.
The Use Case: An Automated AML Approval Workflow
To make this practical, we'll use a common and powerful real-world example: an Anti-Money Laundering (AML) screening process.
Our DecisionRules rule will analyze a financial transaction and assign it to one of three categories: Auto-Approved, Flagged for Review, or Escalate to Compliance. While "Auto-Approved" is a closed case, the other two outcomes require a human to make the final call. This "human-in-the-loop" approval process is a perfect task for an automation platform.
Pattern 1: Executing a Decision from N8N
Our first goal is to build a workflow that starts in N8N, calls our AML rule in DecisionRules, and then automatically routes the decision to the right place—in this case, sending an email notification if the transaction needs review.
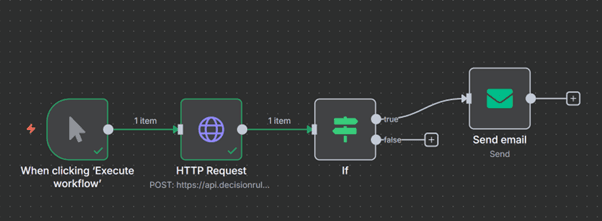
Let's build this step-by-step. In your N8N canvas, start with a manual trigger ("When clicking 'Execute workflow'") and add an HTTP Request node. You have two easy ways to configure it:
Step 1: Configure the HTTP Request Node
In your N8N canvas, start with a manual trigger ("When clicking 'Execute workflow'") and add an HTTP Request node. This node will be responsible for communicating with the DecisionRules API. You have two easy ways to configure it.
Option A: The 10-Second Setup (Import cURL)
This is the fastest method. In the DecisionRules Testbench for your rule, click the "cURL" button to copy the request. Then, in the N8N HTTP Request node, simply click "Import cURL" and paste. Everything, the URL, headers, and body, will be configured for you.
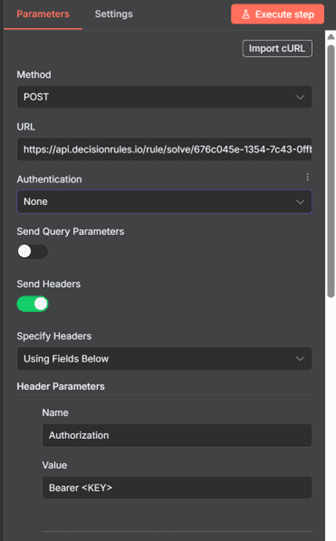
Option B: Manual Setup
If you prefer to set it up manually, configure the following parameters:
Method: POST
- URL: The "Solve API" URL for your rule (found in DecisionRules).
- Send Headers: Toggle ON.
- Header Name: Authorization
- Header Value: Bearer
Step 2: Provide the Input Data (The Body)
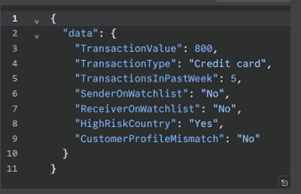
The final piece of the HTTP Request configuration is the Body. This is the input data that you want DecisionRules to analyze. The API expects this data as a JSON object, wrapped inside a parent object called "data".
In the N8N node, go to the Body section and paste your input JSON. For our AML example, it will look like this:
Step 3: Create a Conditional Path with the IF Node
Now that you have a decision from DecisionRules visualized in the right panel, it's time to make your workflow act on it. We'll use N8N's powerful IF node to create a fork in the road, sending the workflow down a different path based on the rule's outcome.
- Add an IF node to your canvas and connect it to the output of the HTTP Request node.
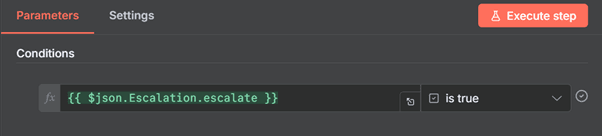
- In the IF node's Conditions, we need to tell it what to look for in the data it received from DecisionRules. We'll use an expression to inspect the JSON output. For our AML rule, if the output object is named Escalation and has a property called escalate, the expression would be: {{ $json.Escalation.escalate }}
- Set the rest of the condition to check if this value is true. Your configuration should look exactly like this:
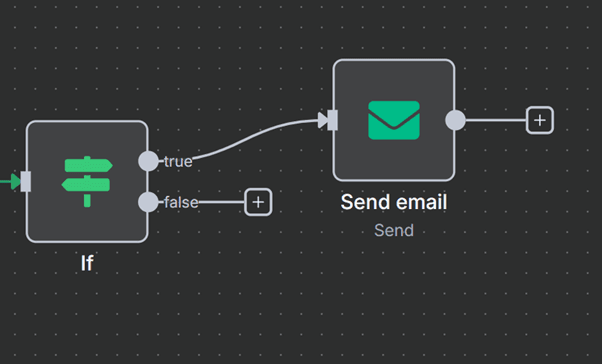
Your workflow now has two distinct paths branching from the IF node: a "true" path for when a transaction needs to be escalated, and a "false" path for all other outcomes.
Step 4: Define the Action
The final step is to define what happens when the escalation condition is met.
- Add a Send Email node to your canvas.
- Crucially, connect the "true" output of the IF node to the input of the Send Email node. This ensures an email is only sent when the escalation condition is met.
- Configure the Send Email node with the recipient, subject, and body of the alert. You can even pull data from the DecisionRules output (like a transaction ID or customer name) to create dynamic, context-rich notifications.
While we're using the generic Send Email node, N8N has dedicated nodes for Gmail, Slack, and Microsoft Teams that offer even deeper integration for your specific tools.
Pattern 2: Triggering an N8N Approval Workflow from DecisionRules
Now let's reverse the flow. What if a decision process, initiated from any of your applications, needs to kick off a human approval workflow? In this pattern, DecisionRules acts as the "brain," identifying the need for an escalation, and N8N acts as the "hands," orchestrating the multi-step approval process.
Our goal is to configure our DecisionRules flow to make a REST API call to an N8N webhook, but only when our AML rule determines a transaction needs review.
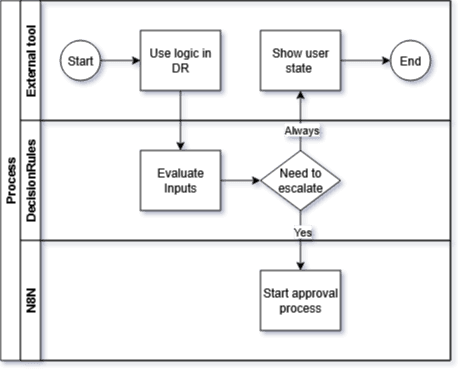
This diagram illustrates the flow: an external tool calls DecisionRules, which evaluates the data. If an escalation is needed, it triggers N8N to start the approval process.
Step 1: Build the Receiving Workflow in N8N
Before DecisionRules can trigger anything, we need to build the N8N workflow that will listen for the trigger.
- In a new N8N canvas, your first node will be the Webhook trigger. When you add this node, N8N automatically generates a unique URL for it. This URL is the endpoint that DecisionRules will call. Copy this URL now; you will need it in the next step.
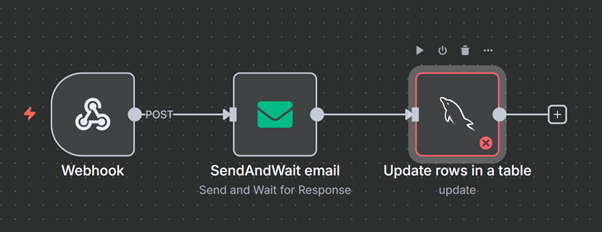
- Connect the Webhook to the nodes that define your approval process. The workflow shown above is a classic example:
- SendAndWait email: This node sends an email to an approver with "Approve" and "Reject" links. The workflow then pauses, waiting for the user to click one of the links.
- Update rows in a table: Once the user responds, this node can take the result and update a database record to finalize the transaction's status.
With this in place, you now have a powerful, on-demand approval service waiting to be called.
Step 2: Trigger the Webhook from DecisionRules
Now, let's switch back to your DecisionRules flow. We need to add the logic that calls the N8N webhook we just created, but only when an escalation is required.
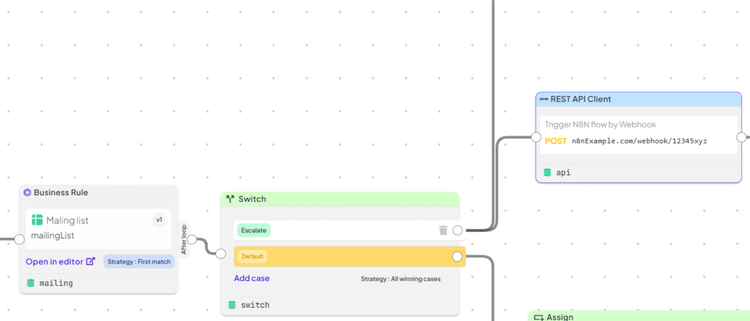
- In your DecisionRules flow, add a Switch node after your Business Rule. The Switch will check the output of the rule.
- On the "Escalate" path of the Switch, add a REST API Client node. This is the node that will trigger our N8N workflow.

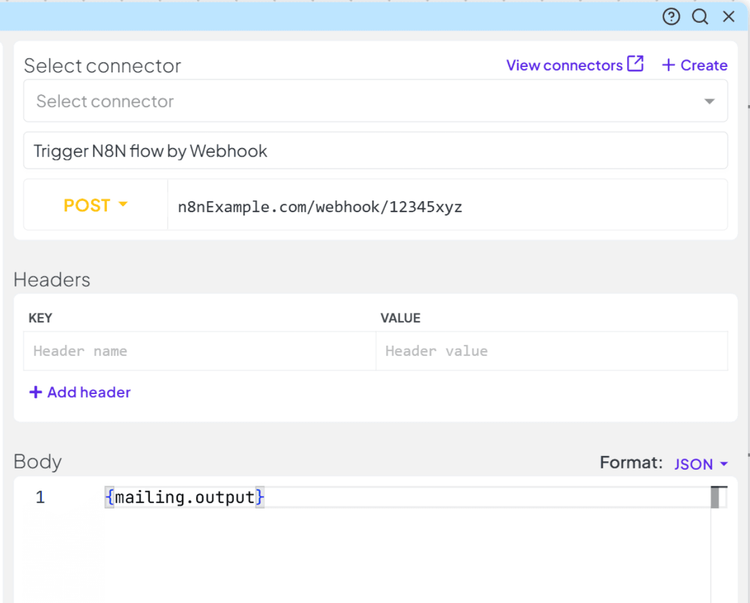
Now, let's configure the REST API Client node. This is where you connect the two platforms.
- Select Connector: Click the "Select Connector" dropdown.
- POST URL: Paste the Webhook URL that you copied from N8N in the previous step.
- Body: This is how you pass data from DecisionRules to N8N. You can construct a JSON object using data from your rule's output. For example, to send the mailing list information, you would use: { "mailing": mailing.output }
And that's it. Your DecisionRules flow will now execute its logic, and if an escalation is needed, it will instantly trigger your N8N approval workflow, passing along all the necessary data. Crucially, the DecisionRules flow doesn't wait; it immediately returns its own result to the original calling application while N8N manages the separate, asynchronous approval process.
Conclusion: From Simple Rules to Powerful Workflows
As you've seen in these two patterns, connecting DecisionRules and N8N is incredibly straightforward. The API-first design of DecisionRules means you can seamlessly integrate your powerful business logic with the vast orchestration capabilities of modern automation platforms.
You haven't just connected two tools; you've created a system where your business experts can define the "what" (the decision logic) and your automation workflows can handle the "how" (the notifications, approvals, and system updates). This is the foundation of true enterprise automation.
Ready to build your first automated decision workflow?

Ondrej Brejla
Business Analyst