Key Takeaway
Eliminate Custom Middleware
Replace fragile, hard-coded REST API nodes with a single, maintained connector that scales to 7,000+ services
Bidirectional Architecture
Learn how to push decision results out via Webhooks and pull external events in to trigger logic flows automatically
Asynchronous Processing
Master the `Start Job` → `Find Job Info` pattern to handlemdt, long-running calculations without timeouts
The Integration Tax is Obsolete
For years, implementing a decision engine came with a hidden "tax" - integration overhead.
While the logic itself, pricing rules, risk scoring, or eligibility checks , was centralized and clean, the plumbing required to connect that logic to the real world was messy. If you wanted your rule engine to email a customer, update a CRM, and notify a Slack channel, you were forced to build custom REST API handlers for each service.
The Old Way: Fragile Custom Code
In a traditional setup (the "Integration Nightmare"), a single decision flow often looked like a patchwork of logic and infrastructure code:
- You had to configure individual API endpoints for SendGrid, Salesforce, or Google Sheets.
- You had to manage OAuth tokens and authentication headers manually.
- If Salesforce changed their API version, your decision rule broke.
Your clean business logic was cluttered with technical debt. Instead of focusing on "If Risk > 60, then Reject," your team was debugging connection timeouts.
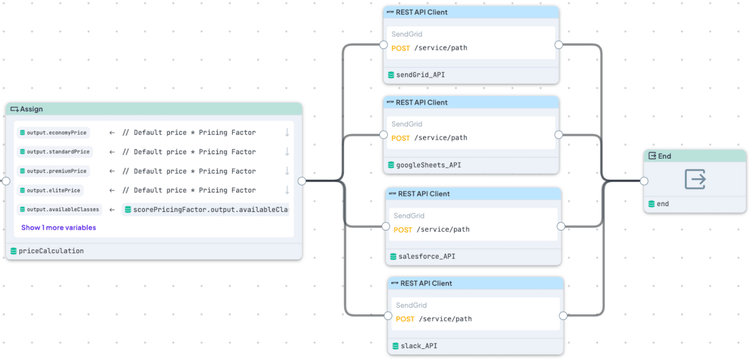
Integration overhead with 4 REST API integration nodes — each with complex endpoint and authentication configurations
The New Way: Logic Separated from Transport
The DecisionRules and Zapier bidirectional integration solves this architectural flaw by decoupling Decision Logic (thinking) from Data Transport (moving).
- By using Zapier as the middleware layer, you remove the integration logic from your rule engine entirely.
- DecisionRules focuses purely on calculating the result.
Zapier handles the authentication, retries, and formatting for 7,000+ downstream applications.
The result is a system where adding a new notification channel takes 15 minutes of configuration, not 8 hours of development.
Part 1: Triggering Downstream Actions (DecisionRules → Zapier)
This pattern lets your Integration Flow automatically trigger actions across any connected apps when it completes.
Step 1: Create a Zapier Webhook
First, create a "listening point" in Zapier, a webhook that catches notifications from DecisionRules whenever something important happens.
- Log into your Zapier account and click Create Zap.
- For the trigger, select Webhooks by Zapier.
- Choose Catch Hook as the trigger event.
- Zapier generates a unique webhook URL, copy this URL, you'll need it next.

The webhook URL you need to copy
Step 2: Configure the Webhook in DecisionRules
Now tell DecisionRules where to send notifications.
- In DecisionRules, navigate to Space → Webhooks (left sidebar).
- Click + Add Webhook in the upper right corner.
- Configure your webhook:
- Endpoint URL: Paste your Zapier webhook URL.
- Alias: Give it a memorable name (e.g., *insurance-pricing-prod*).
- Events to send: Choose when to trigger notifications:
- `JOB.COMPLETED` - When your flow finishes successfully.
- `JOB.CANCELED` - If processing is stopped manually.
- `JOB.ERROR` - If an error occurs
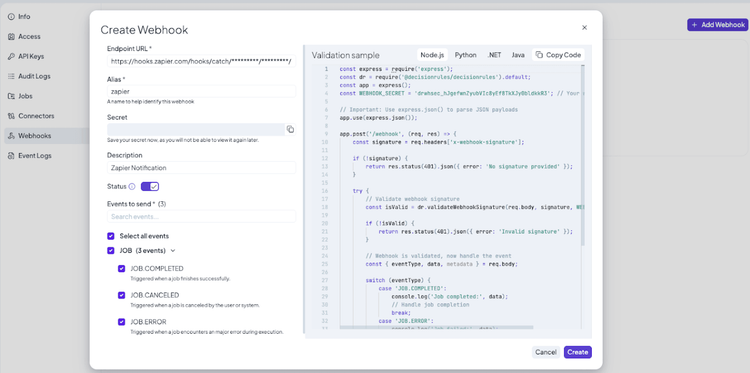
The webhook configuration dialog showing endpoint URL, alias field, and event checkboxes
Step 3: Add Webhook to Your Integration Flow
Critical Detail: Webhooks only work with Integration Flows, not regular Decision Flows. Why? Because Integration Flows are designed for long-running, asynchronous processes, perfect for triggering external actions.
For this example, we'll use the Insurance Pricing from Telematics template:
- Find the template: Click the plus icon in main menu → Search for Insurance Pricing from Telematics → Click Use Template. Or find the template here .
- Switch to Integration Flow: Look at the top right corner → Click the Decision Flow button → Select Integration Flow.
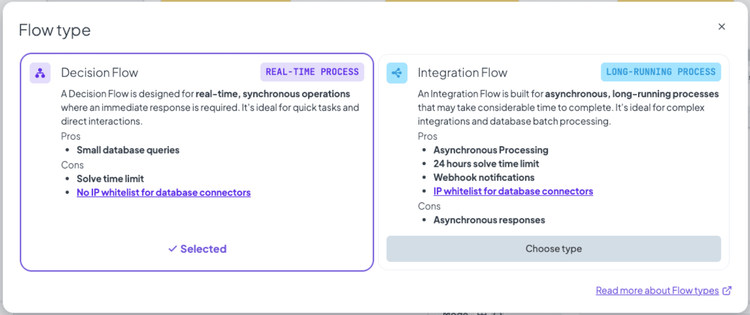
The dialog showing the difference between Decision Flow (real-time) and Integration Flow (asynchronous, webhooks enabled)
3. Add your webhook: Click the Webhooks button → Select the webhook you just created → Click OK.

The webhook selection dialog showing your configured webhook in the list
That's it. Your flow is now connected. Every time this flow runs and reaches a conclusion, it automatically pings your Zapier webhook with all the relevant data.
Step 4: Set Up Zapier Workflow Logic
Back in Zapier , you need to decide what happens when those notifications arrive.
- Test your webhook: Run your DecisionRules flow once to send sample data to Zapier (this helps Zapier understand the data structure).
- Add conditional routing: Add a Paths step in your Zapier workflow, think of paths as different branches, each handling a different outcome.
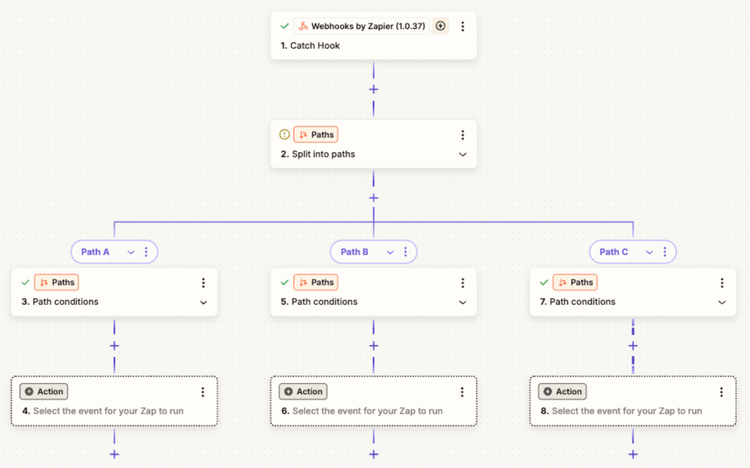
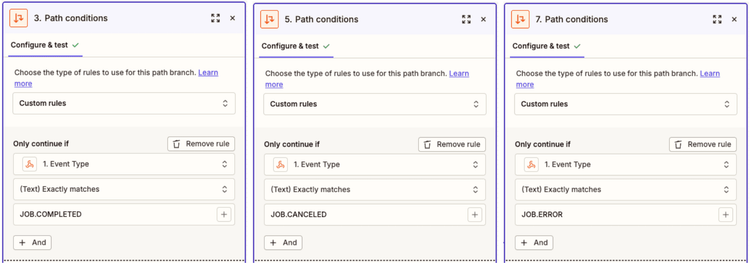
Configuring the Paths:
Path A - Success Handler:
Condition: Event Type exactly matches `JOB.COMPLETED`
Actions: Send approval email to customer, Create Salesforce opportunity, Update Google Sheets.
Path B - Error Handler:
Condition: Event Type exactly matches `JOB.ERROR`
Actions: Alert IT team in Slack, Create Jira ticket.
Path C - Manual Review:
Condition: Event Type exactly matches `JOB.CANCELED`
Actions: Create tasks in Asana, Notify manager.
Zapier workflow showing Catch Hook → Split into Paths → Each path has conditions and actions
The Result: One Configuration, Unlimited Connections
Each "Action" node inside these paths can be any of Zapier's 7,000+ applications. You have built a fully automated workflow from decision to action without writing a single line of API integration code.
Each action node in Zapier can be one of more than 7,000 application
Pro Tip: While you could create three separate webhooks (one for each event type), using one webhook with Paths keeps your setup cleaner and easier to maintain.
Part 2: Launch DecisionRules Flows from External Events
Now, let's flip the script. Instead of DecisionRules pushing notifications out, we will configure external events—like a new lead, a form submission, or a payment—to pull DecisionRules into action automatically.
Understanding Your Options: Sync vs. Async
When you add DecisionRules as an action in Zapier, you aren't limited to a single "run" command. You have a suite of tools designed for different architectural needs:
- Solve Rule: Designed for speed. Use this for synchronous decisions where you need an instant answer. It runs your rule and returns the result immediately.
- Start Job: The heavy lifter. This launches an Integration Flow, perfect for complex processes that might call external APIs or chain multiple decisions. Because it is asynchronous, Zapier starts the job and moves on without waiting.
- Find Job Info: The status checker. This lets you poll a running Integration Flow to see if it finished, if it’s still processing, or if it encountered an error.
- Cancel Job: The kill switch. Stops a running Integration Flow if data changes and the result is no longer needed.
DecisionRules action options in Zapier
The Scenario: Automated Telematics Pricing
For this example, we will use the Start Job action with the Insurance Pricing from Telematics template. Imagine your insurance company tracks driver behavior. When raw driving data arrives in a Google Sheet, you want to automatically pick up that row, calculate a personalized risk score, and determine pricing tiers .
Step 1: Set Up the Trigger (Google Sheets)
First, you need something to trigger the workflow:
- Choose your trigger: Google Sheets → New or Updated Spreadsheet Row.
- Connect your Google Sheets account.
- Select the spreadsheet where telematics data is logged.

Sample Google Sheet
Step 2: Add DecisionRules Action
Now comes the interesting part:
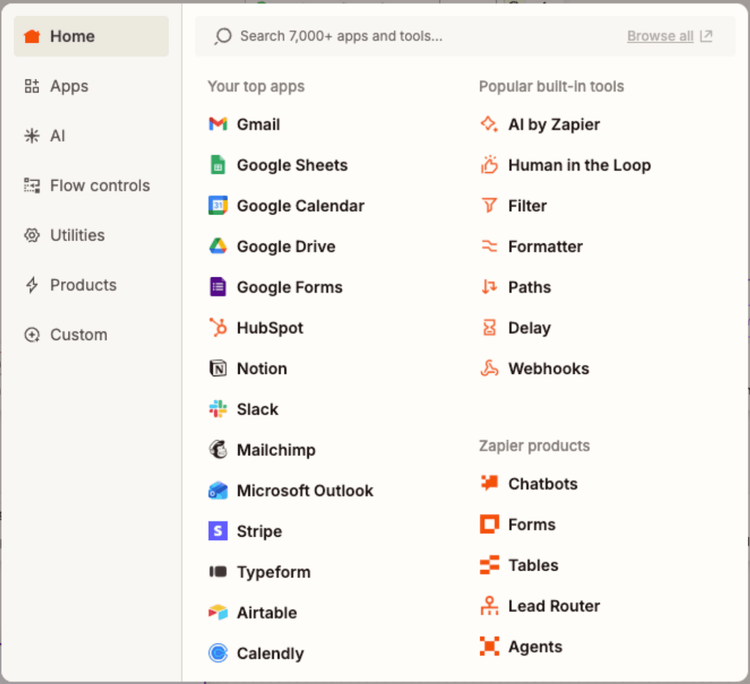
- Click the + button to add an action.
- Search for DecisionRules in the app directory.
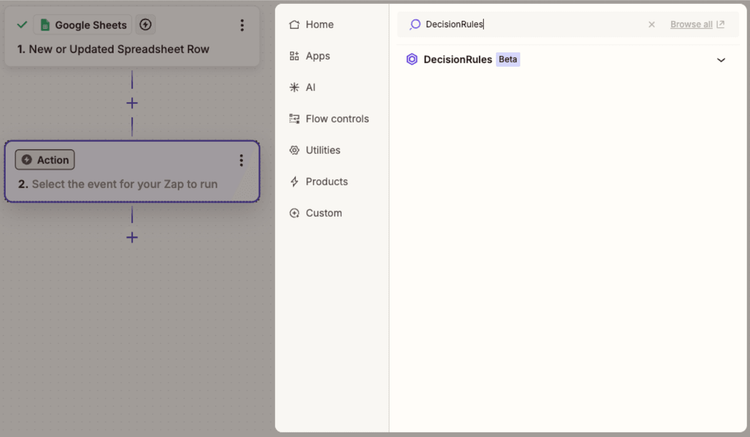
Zapier app search showing DecisionRules
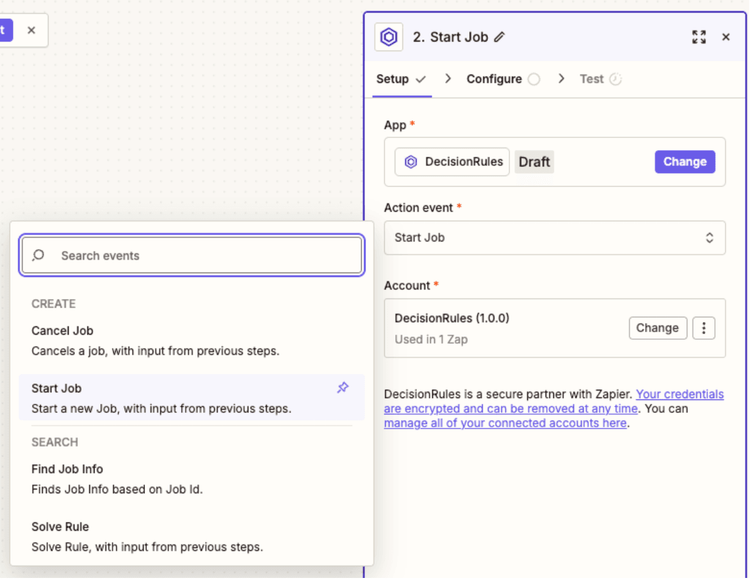
3. Select DecisionRules → Choose Start Job.
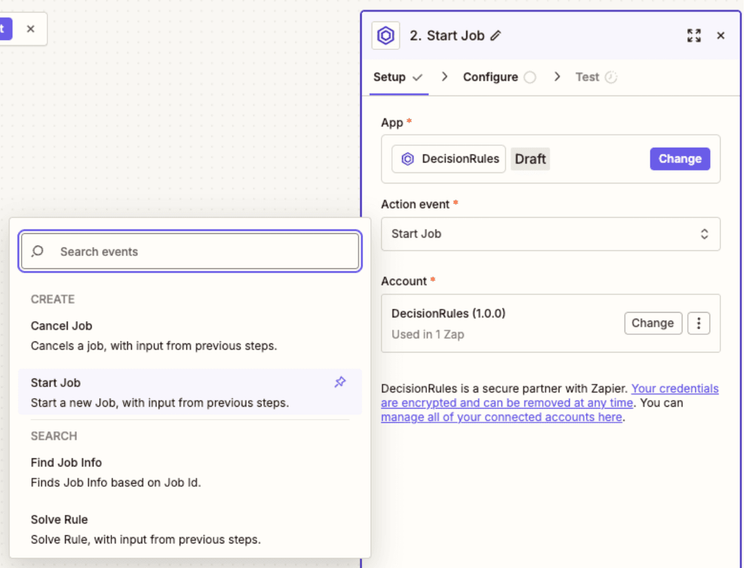
Start Job action configuration panel
4. Connect your account: Zapier will prompt you to connect your DecisionRules account (one-time setup — credentials are encrypted and stored securely).
Step 3: Configure the Job
Tell Zapier which Integration Flow to run and what data to send:
1. Select your flow: Choose Insurance Pricing from Telematics from the dropdown.
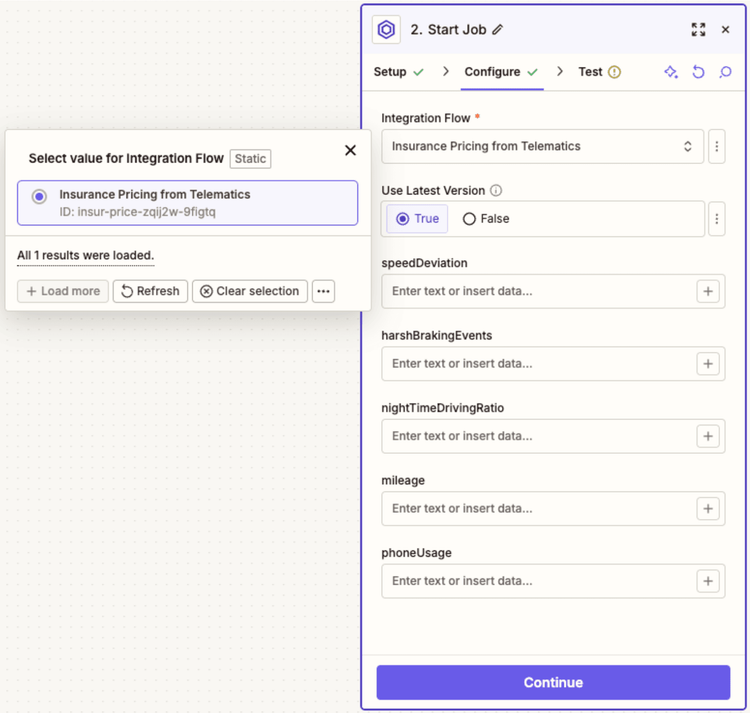
Dropdown showing available Integration Flows
2. Map your fields: This is where it gets really useful — you can map data from your trigger directly into the flow's input. Zapier makes this visual and intuitive.
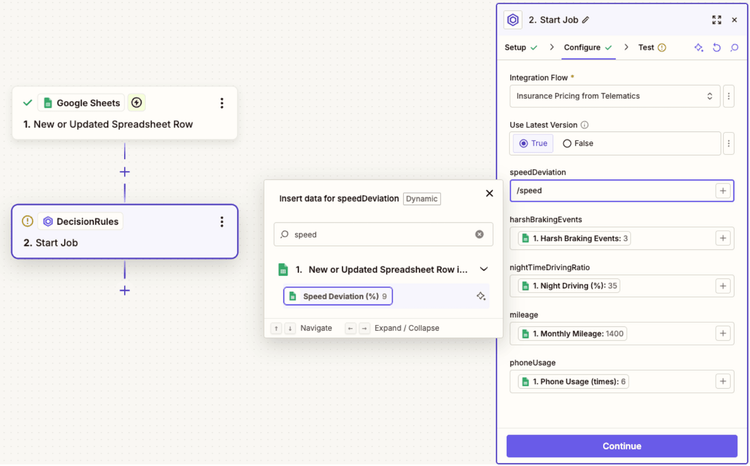
Zapier showing dropdown menus to map Google Sheets columns to DecisionRules inputs
That's it. No code required. Just click and select your fields from the dropdown menus.
Step 4: Understanding Asynchronous Execution
Here's an important detail, when you test the Start Job action, you won't see the calculated pricing results immediately. Why? Because Integration Flows run asynchronously.
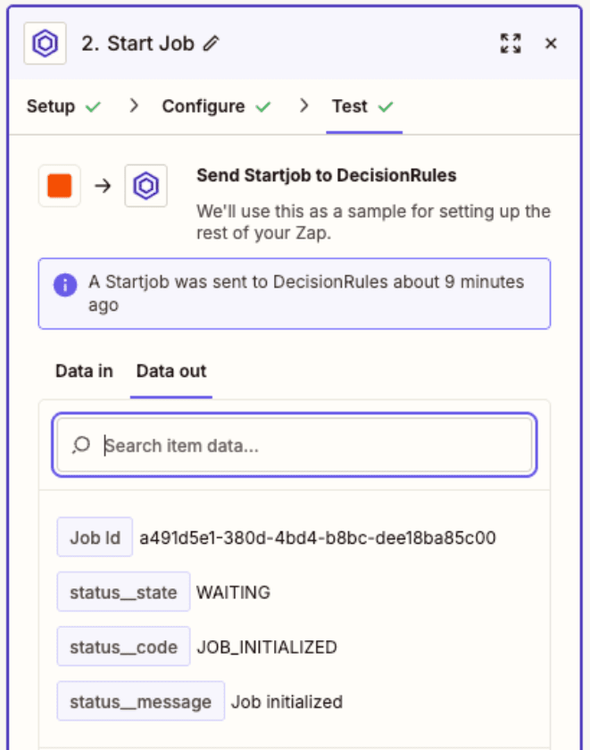
Start Job output showing Job ID, status_state, status_code and status_message
The Start Job action returns only a confirmation that the job was initialized — it gives you a Job ID and status. This is by design: Integration Flows can take time to complete, especially when calling external APIs or processing complex logic.
But when you open the Jobs section in DecisionRules, you can confirm that the job executed successfully:

DecisionRules Jobs panel showing completed job with execution time: 567ms
Step 5: Get the Results
So how do you get the actual output from your flow? Use the Find Job Info action.
- Add another DecisionRules action: DecisionRules → Find Job Info.
- Pass in the Job ID: Map the Job ID from your Start Job action.
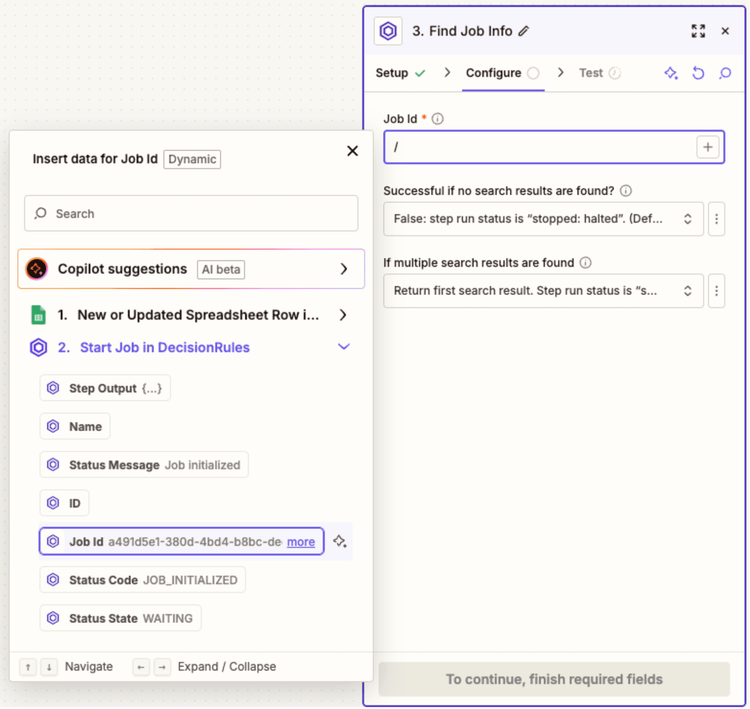
Find Job Info configuration showing Job ID field populated with data from Step 2: Start Job
3. Test the action: When you test, you'll see the complete output from your DecisionRules flow.
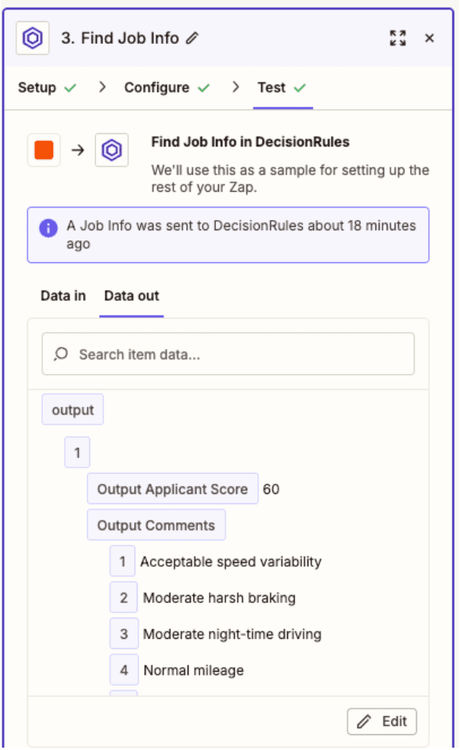
Example of output after Insurance Pricing from Telematic Flow was executed
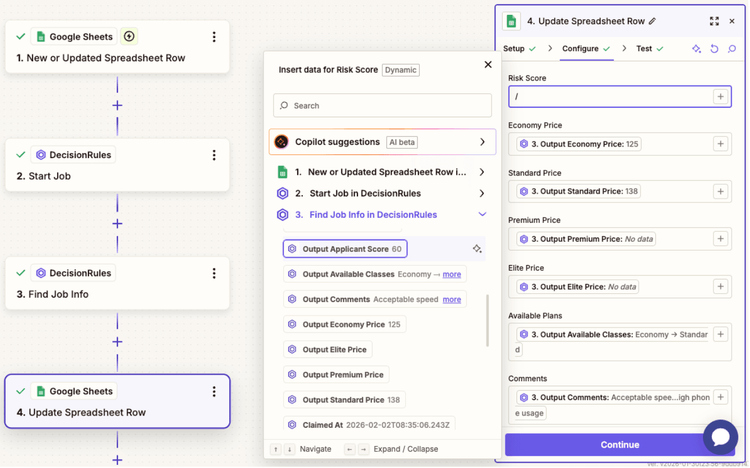
Step 6: Complete the Loop (Update Your Spreadsheet)
Now that you have the calculated data, complete the circle by updating your Google Sheet with the results:
- Add a Google Sheets action → Update Spreadsheet Row.
- Map the outputs: Connect Find Job Info outputs to your spreadsheet columns.
Zapier showing mapping from DecisionRules outputs to Google Sheets columns
3. Test the complete workflow: After testing, see the results populated in your Google Sheet, data automatically flowing from telematics metrics through intelligent decision logic and back to your spreadsheet.

Google Sheet row now showing all calculated values populated in the result columns
What You've Just Built
- Trigger: New telematics data appears in Google Sheets.
- Action: DecisionRules - Start Job (launches Insurance Pricing flow).
- Action: DecisionRules - Find Job Info (retrieves the results).
- Action: Google Sheets - Update Row (writes results back).
The Transformation: ROI & Strategy
DecisionRules & Zapier integration isn't just a technical connection, it represents a fundamental shift in how your business approaches automation. We call this the shift from the "Integration Tax" to " Integration Freedom."
In the old world, every new process improvement came with a developer tax. You wanted to notify a Slack channel when a high-risk insurance claim was rejected? That was a ticket to IT. It was 8 hours of coding, testing, and debugging OAuth tokens. Your brilliant decision logic was cluttered with fragile integration code, making it harder to read and risky to change. Innovation stalled because the "plumbing" was too expensive to build.
In the new world, that tax is gone. You have "Integration Freedom." Your business logic is pure, focused entirely on thinking. The doing, sending emails, updating databases, creating tickets, is handled by Zapier's visual interface. This means a non-technical product manager can spin up a new notification channel in 15 minutes, without writing a single line of code or bothering the engineering team.
The Cost Savings: A Business Case
Let's look at the hard numbers. Consider a single workflow that needs to connect DecisionRules to four external services (e.g., Salesforce, Slack, SendGrid, and Google Sheets).
If you built this with custom code, you are looking at roughly 10 hours of initial development time per workflow . At a standard developer rate of $100/hour, that’s a $1,000 startup cost. Then add the invisible cost of maintenance, API versions change, credentials expire, services go down. Over a year, you easily spend another 20 hours ($2,000) just keeping the lights on. Total First Year Cost: $3,000.
Now compare that to the Zapier approach.
Setup takes about 15 minutes of business-user time. Maintenance is virtually zero because Zapier manages the API updates for you. Even with a Zapier Professional plan (~$240/year), your total first-year cost is roughly $240.
That is a savings of $2,760 per workflow, in the first year alone. Multiply that by 5 or 10 automated processes, and you aren't just saving money, you are freeing up weeks of developer time to focus on your core product instead of plumbing.
Beyond Insurance: The Possibilities Are Endless
This pattern—decoupling intelligence from execution—applies across every industry.
E-commerce Fraud Prevention
Imagine an order comes in through Shopify. Instead of a manual review queue that bottlenecks shipping, DecisionRules instantly analyzes the transaction for fraud patterns. Safe orders are auto-approved and sent to fulfillment. Risky orders are flagged, tagged in your CRM , and routed to a specialist via Slack, all in milliseconds, ensuring you catch fraud without slowing down sales.
Intelligent HR Onboarding
Onboarding shouldn't be a checklist of manual emails. When a new hire form is submitted, DecisionRules can automatically determine their equipment needs and access rights based on their role and department. The result? IT tickets are created, welcome emails are sent, and calendar invites are scheduled instantly. The new hire gets a perfect Day 1 experience, and HR gets their day back.
Instant Loan Processing
In fintech, speed is the product. When a loan application arrives via Typeform, you can't wait for a human underwriter. Trigger a DecisionRules credit assessment flow that pulls data, scores risk, and generates a decision. Approved applicants get a contract emailed instantly; rejected ones get a polite, compliant explanation. You move from "application pending" to "deal closed" while your competitors are still opening the file.
Conclusion
You have just discovered the fastest path from business logic to real-world action. The era of building custom middleware for every new SaaS tool is over.
By combining the decision-making power of DecisionRules with the connectivity of Zapier, you eliminate the bottlenecks that slow down automation. You stop building plumbing and start building value. The only question left is: what will you automate next?

Ivan Peresta
Product Analyst